HIGHLIGHT ALERT can be used in camera and also in photoshop, lightroom and camera raw to show the overexposed areas in a photo. If shooting in Raw you can then improve these overexposed areas.
The Highlight alert is a very visual representation of any over exposure in a photo.
Photoshop has two triangles in the top of the histogram which are the shadow alert, on the left hand side and the highlight alert on the right hand side.
Photoshop Tutorial – When you’re making changes to your images in Camera Raw, it’s important that you keep your eye both on the image as well as the histogram, because if you’re making changes, you don’t want to be pushing any of the values in your shadow and your highlights to pure black or pure white. Or if you do do that, you want to make sure that you know that you’re doing it. But because it’s hard to look in both places, there are two icons that will allow you to see your clipping. So if you toggle on the one on the left, that’s going to show our clipping warning in the dark shadow areas, and the one on the right is going to show the clipping of the highlights, or the light areas of the image. The keyboard shortcuts for this are the U key toggles on and off the one for the darks, which is the underexposure and the O key toggles the highlight warning for the light areas, which would be the overexposure. You can then adjust using the black and white sliders.
HISTOGRAM is a statistical representation of the greyscale. It shows how the pixels are distributed by graphing the number of pixels at each of the 256 brightness levels in an image. These brightness levels include black and white.
Black Shadows Exposure Highlights
The photo is underexposed if the histogram touches the Black end of the line, and overexposed if it touches the highlights end of the line.
Some photographers view the histogram on the back of their camera LCD screen after each shot – mostly to check whether there are any tones at the extreme edges (black/underexposed or white/overexposed) as this will indicate a loss of detail in dark or light areas.
There is no right or wrong histogram – it is quick reference to tonal references.
Definition – An image histogram acts as a graphical representation of the tonal distribution in a digital image. It plots the number of pixels for each tonal value. By looking at the histogram for a specific image a viewer will be able to judge the entire tonal distribution at a glance
LIGHT METERING measures the middle grey of an image and uses this measurement as the mid point for the exposure. Very important to ensure that the image is correctly exposed. Use a grey to se the light meter.
COLOUR CHANNELS RGB can be switched off in photoshop to get different hues. In same way that Sergie Gorsky developed his three lens camera and James Clark Maxwell 1855 discovered the three light spectrums to create the first colour photos and his cameras effectively do the same as DSLRs today.
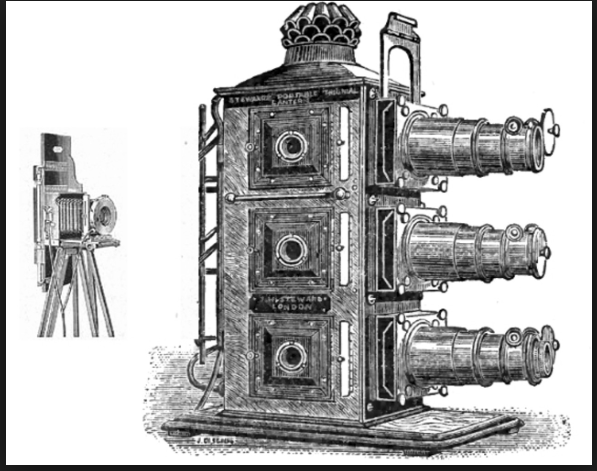
In the photos below you can see how the three images are overlaid and produce the colour image.


RAW vs JPEG – in nearly all circumstances (apart from high speed shooting) all photos should be taken in RAW.
Raw will capture the greyscale – white and black
1 Bit colour =2(1) = 2 Black and White
2 Bit colour = 2(2) = 4 black and white and 2 greys
3 Bit colour = 2(3) = 8 black and white and 6 greys
8 Bit colour = 2(8) = 256 black and white and 254 greys.
etc
higher numbers = more greyscale = richer photos. Use 8 bit colour for black and white photography to ensure richer greys and better black and white printing.
RGB channels = each channel has 256 scales so when you add them all together
Red 256 x Green 256 x Blue 256 = 2 = 16384 greyscales so much greater detail in RAW. JPEG only 256.
When working in photoshop choose higher BIT channel as more details are recorded in the the image.
open – image – mode – channel
Can only adjust colour and tonal range
Cannot print in 16 bit – have to save as 8 bit
To print big size prints save RAW to TIFF – as TIFF will print better tonal values and keep the quality. TIFF files are very large in size compared to JPEGs because no compression is used.
Lossy Compression: Lossy means with data loss. JPEG compression does discard some image data based on the amount of compression used.