Health And Safety Outside The Studio

When working outside a studio it is also essential to consider the Health and Safety issues, legal and also ethical issues when preparing for and managing a shoot.

  1.  Consideration should always be taken of all the general public that are in close proximity to the shoot.  As a photographer you will also attract bystanders.  It is essential that they do not obstruct the photographer at work and indeed that the photographer does not obstruct them.
  2. Flash lights and any wiring for lights should not be allowed to trail, unmarked, along the floor.  They should all be clearly visible to the general public so they do not become trip hazards.
  3. When shooting from above the subject/object care should be taken when using steps.   Correct steps should be used and not improvised using other items. They should be placed on flat ground or have extra support or be held by a photographer’s assistant.
  4. Flashguns should be used with care as they are extremely strong light and can damage eyes.  The flash must be used at the correct distance from the subject.
  5. All equipment should be used with care – tripods should be placed where they are visible and not as trip hazards.
  6. Care should be taken to give the model adequate breaks during the shoot.
  7. Photoshoots should ideally be planned to ensure that the correct items are available and everyone works efficiently.  This will also help prevent accidents as everyone will know their role.
  8. Any spillages of liquid or items should be prompted cleared up to prevent trip hazards and damage to electrical equipment and cameras.
  9. Electrical shocks from the lighting equipment should be reported to the responsible person.
  10. Copyright rules should be considered when planning a shoot to ensure that they are not infringed.
  11. At the end of the shoot all equipment should be tidied away and the area left unaffected by the shoot.

Health And Safety In A Studio

When working in a studio it is essential to consider the Health and Safety issues, legal and also ethical issues when preparing for and managing a shoot.

  1.  Consideration should always be taken of all the people in the studio to ensure that they are aware of their roles in the participation of the shoot to ensure that they do not obstruct the photographer at work.
  2. Wiring for lights should not be allowed to trail along the floor, ideally all lights should be hung from above. Hazard tape or duct tape should be used to secure any cables trailing along the floor.
  3. Care should be taken when changing the hoods of lights as these will get very hot.  Heat resistant cloths should be used.  The correct method for changing the hoods should be demonstrated to any relevant person.
  4. When shooting from above the subject/object care should be taken when using steps.   Correct steps should be used and not improvised using other items.
  5. Flashguns should be used with care as they are extremely strong light and can damage eyes.  The flash must be used at the correct distance from the subject.
  6. Care should be taken to give the model adequate breaks during the shoot.
  7. Photoshoots should ideally be planned to ensure that the correct items are available and everyone works efficiently.  This will also help prevent accidents as everyone will know their role.
  8. Any spillages of liquid or items should be prompted cleared up to prevent trip hazards and damage to electrical equipment and cameras.
  9. Electrical shocks from the lighting equipment should be reported to the responsible person.
  10. Copyright rules should be considered when planning a shoot to ensure that they are not infringed.
  11. At the end of the shoot all equipment should be tidied away and the studio left clean and tidy

Duane Michals – Transforming Images

38763


Duane Michals, was a pioneer of American staged photography:

5489398701555eb4919469457499f654duane-michals-dr-heisenbergs-magic-mirror-of-uncertainty-1998-2duane-michals-dr.-heisenberg’s-mirror-of-uncertainty

125671Screen Shot 2019-06-04 at 22.32.19

“The thing about working as a photographer by walking down the street with a camera looking for something to take a picture of – I did not have to do that because it was already in my head”

Michals did everything that had been banned among the modernists: he made cinematic, narrative sequences, he worked exclusively in his studio with staged models, he wrote stories under or directly at the pictures and he did not care about the technical aspect of photography at all.

T16865B003215duane-michals-visit-with-magritte

Arno Rafael Minkkinen

Minkkinen has created an incredible body of self portraits that blend/transform him into becoming part of the natural landscape.

Many of these photographs verge on the surreal.  His compositions  are a never ending juxtaposition of body parts and the landscape, a hand or a foot cutting the sky, the ground, the water.

In the photos he transforms to part of nature. A human being as part of the landscape. Minkkkinen says:

“Many of my photographs are difficult to make.  Some can even be dangerous. Some of my pictures might look simple but in reality they can test the limits of what a human body is capable of or willing to risk.  So I title them self-portraits so the viewer knows who is in the pictures and who took them.”

Screen Shot 2019-06-04 at 21.47.48Screen Shot 2019-06-04 at 21.47.00Screen Shot 2019-06-04 at 21.46.49Screen Shot 2019-06-04 at 21.46.39Screen Shot 2019-06-04 at 21.46.27Screen Shot 2019-06-04 at 21.46.07

Transformation Through Photoshop

Frequency Separation Retouching

Transformation through Photoshopping an image is the current trend for all phone, amateur, glamour, fashion and indeed any type of photography.  It is the ultimate transformation of a human being into an ultimate, media acceptable image. But there is a lot of argument around retouching and ethics.

THE ETHICS OF RETOUCHING

Retouching, often misnamed as “airbrushing” is the technique of smoothing out the skin in a way that is more of an aesthetic than reality. The frequency separation technique is a requested style often used in Glamour and Fashion photography. It’s used in “high end retouching” and not the kind of technique you would normally use on family portraits and corporate headshots. It’s a way to transform skin into a particular look that is sometimes required in retouching. Some people love this look and others dislike it. A good retouch is something that doesn’t look retouched. In certain situations, this isn’t true, some styles require it to look retouched and “too” perfect is what’s required. Its a great way to smoothen out skin and you can choose to use it as heavily or lightly as you wish.

Screen Shot 2019-06-04 at 21.14.56

WHAT IS FREQUENCY SEPARATION

Basically it is taking a photograph on a layer and splitting it into 2 layers. One layer will hold all the detail and none of the color. The second layer will contain all the color, but not the detail. This way you can blur the colour and even out blemishes without affecting any of the details such as pores in the skin and wrinkles on the colour layer. On the detail layer you can reduce wrinkles and other detail blemishes without changing the colour and creating colour spots. Basically:

Frequency: High Frequency is the detail (think treble). Low frequency is the underlying color and form (think Bass).

Separation: Spilting, dividing etc. In this case splitting into 2 parts.

SURGERY

Editing an image using the Liquify Filter/Facial Reconstruction Features/Face Aware Liquify.

These are controls for each facial element such as jawline, eyes, lips, nose etc.

Can change the asymmetry (uneven eye size or eye tilt/nostril height etc.  Use the dominant feature as your guide and ‘correct’ the other to match.

The ‘Forward Warp Tool’ allows you to nudge and move elements/features as if they were soft wax.  Changing the size of brush selected will determine how large an area you will be moving around and you can mark an area for ‘protection’ using the Freeze tool, so that the brush does not inadvertently smudge or move a section you do not wish to be included.

The ‘Reconstruct Tool’ brush allows you to Paint an ‘undo’ over the areas that you wish to bring back into the picture (the Restore All button will restore all removed effects).  This adding back may back the photos more real (think Robert De Niro’s lined face rather than Melania Trump’s photoshoot fact).

Screen Shot 2019-06-04 at 21.13.50

Screen Shot 2019-06-04 at 21.25.45Screen Shot 2019-06-04 at 21.19.07


Transformation

The Crystal Maze

Using the idea inverted image of Camera Obscura and the transformation of objects into the unknown, I used a lens ball to give a completed tranformed view of Bushy Park.  I walk daily in the park and and seeking a way of photographing it in a completed new perspective.

The lens ball inverts the image as refraction happens when light passes through an object of denser mass, such as water or glass. When refraction occurs with a transparent spherical object  an inverted image of the scene behind the ball is seen. The lens elements in cameras work in the same way but digital technology in the camera inverts the image so it displayed the right way up.  In film camera’s the image is inverted on the film.

fullsizeoutput_568f

A clear bright day was needed, with blue skies to provide contrast to the water, grass or trees.

These was flare from the sunlight but I was happy with this effect.

_DSC8914_DSC8908

The image needed to be sharp and balanced.

_DSC8908_DSC8926fullsizeoutput_5d5efullsizeoutput_5d5f_DSC8943fullsizeoutput_5d60fullsizeoutput_5d61fullsizeoutput_5d62fullsizeoutput_5d63

I enhanced the colour of the photos to make a more dramatic effect, the house appears haunted.  I would love to explore the possibilities of using the lens ball in different environments.

fullsizeoutput_5d65fullsizeoutput_5d69fullsizeoutput_5d67fullsizeoutput_5d66

I do need a proper stand for the ball!  And to definitely be aware of surrounding environment when setting up the shots to avoid trip hazards.


Camera Obscura

Richard Learoyd

Richard Learoyd, was born in 1966, and graduated in Fine Art Photography at the Glasgow School of Art. He has a very unique way of working which creates absolutely unique photographs. He build a giant camera that can best be described as a huge camera obscura. The camera is comprised of two rooms. In one room is the model or the object in a light source. In the other room, behind a large lens, is a huge piece of photographic paper. Once exposed, a unique, life-size direct-positive print is created. Unlike the pinhole camera images, Richard’s photographs are clear of distortion, sharp and very detailed. Apart from the technical aspects, he manages to create poetically stunning imagery. He places people, clothed and nude, as well as objects in front of his lens. The exposure can take 8 hours, so the models have to sit still while being under hot lights for the same amount of time. The final and approved images, he destroys the one’s that are imperfect, have a painter-like quality to them with soft tones and melancholic poses. He considers the method to be a natural step in search of the ultimate image.

images-40learoyd3


Marja Pirila

Marja has been working with camera obscure techniques since 1996 as she is fascinated by the phenomenon.  She uses Camera obscure as a method by which ‘to survey the living environment and mental landscapes, summoning unconscious feelings into the light of day.  In camera obscura darkness, silence and slowness compel one to contemplate the world in a novel way, from new angles. When the space transforms into a “dark room” it conjures up the core and magic of photography again and again. That is when I feel most acutely that I am working with light.

In her Interior/Exterior projects she converts rooms in to camera obscure by covering the window and then capturing the image of a person and that person’s room and the inverted view from the window.

Transformation Project

Life Cycle Of Grass

images-39

Transformation is a life cycle – birth, life and then death. My initial idea is to document the growth of grass.  Grass grows quickly – in a week it can grow to 2 inches from seed (depending on temperature, humidity, sunlight etc) So over a period of 5 days, I plan to take 1 photo every minute, for 12 hours to watch the grass germinate, grow and perhaps, if I don’t water it, to wither and die. The photos will then be collated into a time lapse video.

images-38

This is my set up, using natural light.  With Aperature priority, f5.6, iso 100, jpeg (raw would take too long to use in a video).

IMG_1758

As the project started I set up the camera to take one photo every minute for 10 hours a day.  However, the grass did not germinate till day 3 so I change the setting to one photo every 2 minutes and took photos for 8 hours a day.

_DSC4687_DSC4686_DSC4679_DSC4688_DSC4690_DSC4691


Once the grass germinated I changed the settings to one photo every 1 minute for 8 hours a day.  This also prolonged the life of the battery and a fully charged battery would last the 8 hours shooting time.

This slideshow requires JavaScript.


_DSC5373_DSC5374_DSC5469_DSC5470_DSC5688_DSC5689

Over 12 days I took c5000 photos and concluded only when the grass had died back (partly due to a deliberate lack of watering) after 12 days.  I did not change the settings of the camera during this time and the change in sunlight was adapted by the camera as it was on Aperture Priority.  As the sun moved in the evening it created an effective shadowing of the pictures.

The plan was then to convert the photos using Premier Pro software into a 3 minute film showing the life cycle of the grass.  The 5000 photos converted to a 3 minute time lapse video.

Final Video – Transformation Project


Macro Photography

blog_2_2048xMacro photography uses prime lenses, ideally to create a magnification of 1:1 so the object photographed appears as the same size on the camera sensor.

Macro lenses of different focal lengths allow for a greater distance between the subject and the front of the lens.

Magnification filters can be bought at a lower cost than a macro lens which fit on the front of a standard lens but increase magnification by  2x 4x 6x 10x etc.  A magnification lens will also soften the fee of the object.  The thicker the magnification lens is (thickness of the glass not the magnification) will reduce distortion of the shot.

close-up-lenses

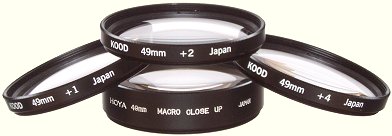
Step up rings can be used to ensure that the filters can attach to any of the lenses in your possession.

Extension tubes 12mm, 20mm and 35mm will create a magnified effect and will work with the data on the camera eg autofocus ABS.

images-36

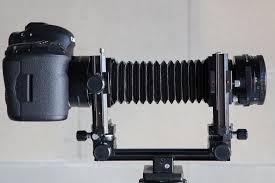
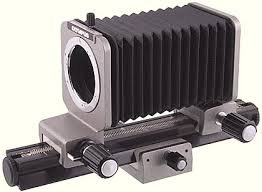
Bellows extension can be used, using the retro format of a bellows, this will also extend the magnification.

Both extension tubes and bellows will loose a couple of f stops on the camera due the loss of light.  The digital display on the camera may change the aperture number on the camera, as it fools the camera into believing it is using a higher f stop eg the actual set up may be f8 but the camera may read f16 if using a bellows as there is less light reaching the sensor.

122806-16x9

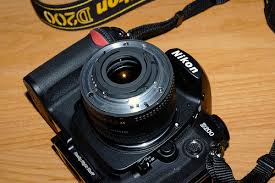
Reversing rings, with aperture control allow standard lenses to be reversed which will then magnify in the same way.

images-32

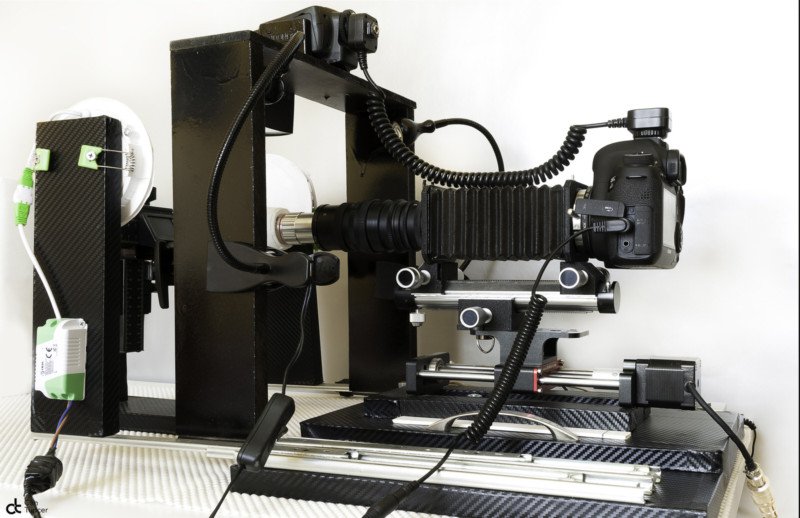
Focusing rails and sliders can be used for stability, in conjunction with a tripod.  These allow for precision and fine focussing.  Levon Bliss using these to ensure his 5000 photos of insects can focus adjusted and then stacked together to create his detailed/anatomic photos.

images-34

Lighting For Macro Photography

Simply using flash on camera is not adequate for macro photography the results would not be good enough.

0415macro003


Off camera flash will soften the light, but it is recommended that the flash is covered by soft paper or cloth to soften.

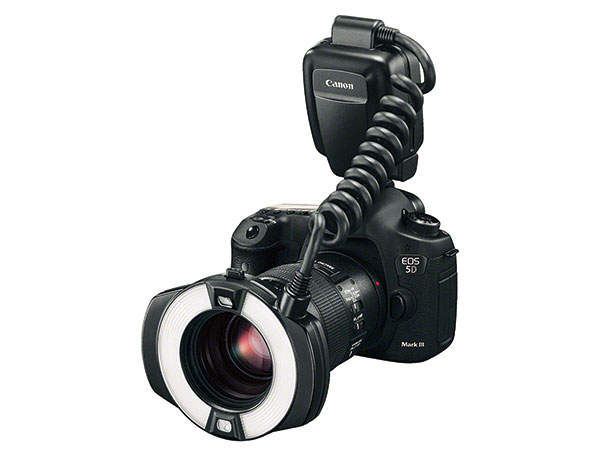
A Macro flash can be fitted to the front of the macro lens and the strength can be adjusted as necessary.  More light a ring flash on the lens.

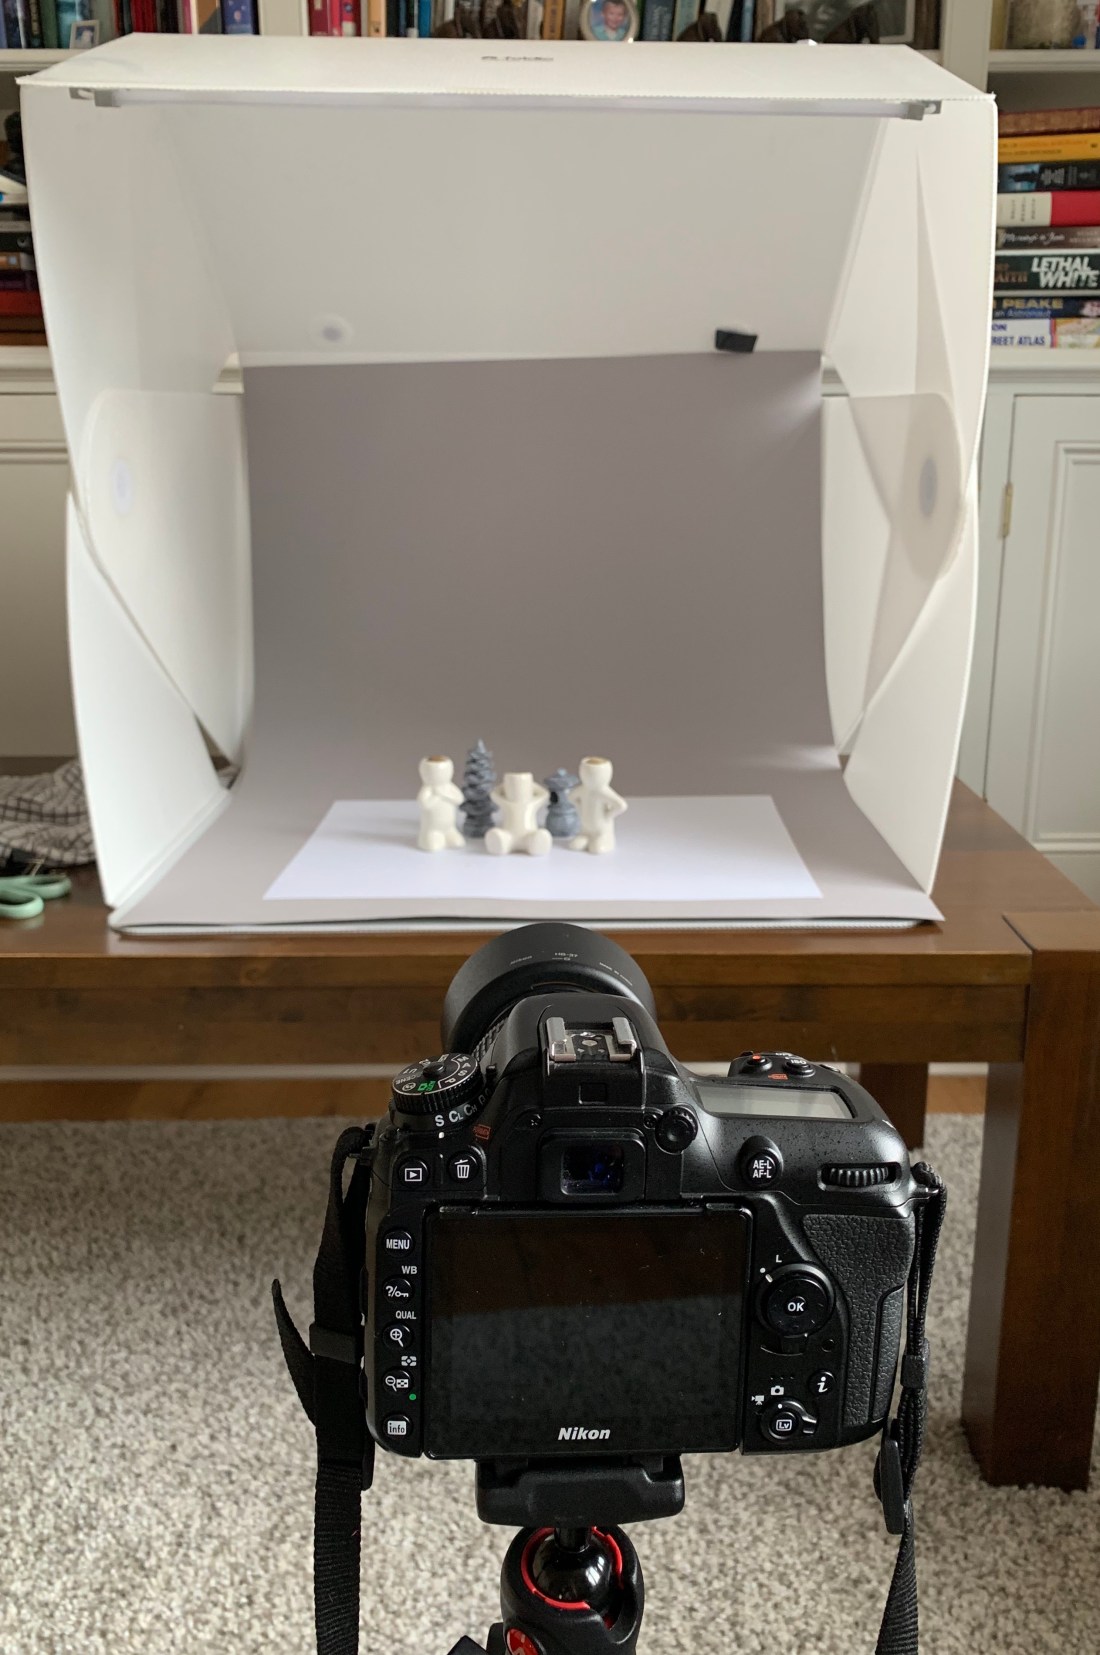
Set Up For Macro Photography

Ideally use a specific backdrop, black card is ideal.

LensSetup-2-800x518

The depth of field will be very narrow – millimetres.  f11 or f16 are best options for depth of field.  The ideal setting can be calculated using a depth of field calculator.

Light meters are also useful.  If you are using a higher f stop eg f16, you would need multiple flashes to get enough light and enough detail.  Once again using the high aperture numbers get the best detail.  The light meter will calculate the best number of multiple flashes.

Focus Stacking

Focus stacking of photos where the focus has been shifted, can be blended in post production Photoshop or Lightroom, to create detailed images.

Bracketing, where the camera takes 3 different photos with different exposures (under, normal, over) can also be useful to ensure adequate detail is obtained.

(Press BKT on the front of the camera and turn the wheel to set the number of images that will be taken).

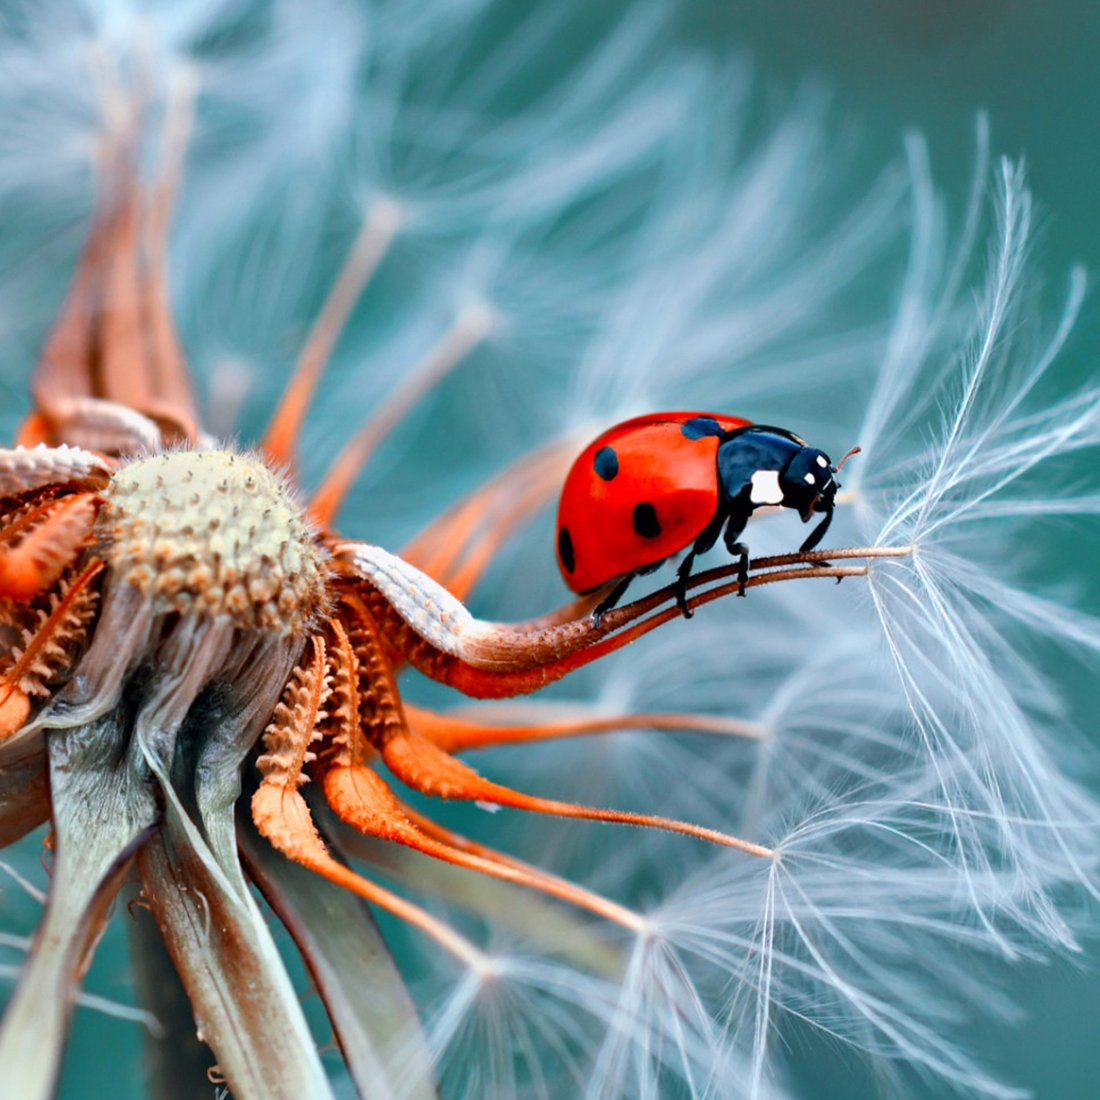
If, like Levon Bliss, you perfect the art of macro photography, the images you create could be these:

Still Life Paintings

M1, M2, M3, M4

For the project to build and photograph a still life set up that would be inspired by a classical painting, I researched the history of still life paintings.

Still Life – Definition

A still life (also known by its French title, nature morte) painting is a piece that features an arrangement of inanimate objects as its subject. Usually, these items are set on a table and often include organic objects like fruit and flowers and household items like glassware and textiles.

The term “still life” is derived from the Dutch word stilleven, which gained prominence during the 16th century. While it was during this time that the still life gained recognition as a genre, its roots date back to ancient times.

History

The earliest known still life paintings were created by the Egyptians in the 15th century BC. Funerary paintings of food—including crops, fish, and meat—have been discovered in ancient burial sites. The most famous ancient Egyptian still-life was discovered in the Tomb of Menna, a site whose walls were adorned with exceptionally detailed scenes of everyday life.

still-life-painting-1

Ancient Greeks and Romans also created similar images of inanimate objects, mainly as mosaics but also as frescoes.  This ‘Still Life with Glass Bowl of Fruit and Vases’ is a 1st-century wall painting from Pompeii:

still-life-painting-2

During the Middle Ages, artists adapted the still life for religious purposes. In addition to incorporating symbolic arrangements into depictions of Biblical scenes, they also used them to decorate illuminated manuscripts.

Dutch Golden Age artists took this interest a step further with their vanitas paintings. Vanitas paintings are inspired by memento mori, a genre of painting whose Latin name translates to “remember that you have to die.” Like memento mori depictionsthese pieces often pair cut flowers with objects like human skulls, waning candles, and overturned hourglasses to comment on the fleeting nature of life.

still-life-painting-4

MODERN ART

The still life remained a popular genre and during the Post Impressionist period Vincent van Gogh  adopted flower vases as his subject.

flower-art-11

Cézanne’s depictions of still life even pay homage to the vanitas genre by incorporating skulls.

still-life-painting-6

Cubist painters such as  Pablo Picasso and Georges Braque painted everyday objects as still life:

what-is-cubism-definition-5

Contemporary Art

Today, many artists put a contemporary twist on the tradition of still life by painting modern-day food and objects in a hyperrealistic , high-definition style that are akin to photography:

Screen Shot 2019-05-18 at 17.55.52